
Important Note On Upgrading to Subtext 1.9
Let me start off by noting that Subtext 1.9 requires ASP.NET 2.0! Thus the upgrade process from a prior version of Subtext (all which run on ASP.NET 1.1) will not be quite as simple as before, but should hopefully not be overly complicated as is the spirit of Subtext.
For Users Who Have Control Of Their Hosting Server
Users who host on their own server, or have Remote Desktop access to their hosting server will have an easier time with the upgrade. My recommendation is to simply setup a new folder with the new version of Subtext, copy in your modifications, and then switch IIS over to ASP.NET 2.0 to point to the new directory. The following is a step-by-step detailed procedure.
- Backup your Database.This should go without saying.
- While you are in Enterprise Manager, make sure the database user that your blog uses to access the database has DBO permissions temporarily. This is required so that the web-based upgrade procedure will work.
- Make sure you can login to the HostAdmin section. On most blogs this would be the /HostAdmin/ directory of the site. For example, on my blog the HostAdmin is located at https://haacked.com/HostAdmin/. If you forget your HostAdmin password, there is a query you can run in Query Analyzer to reset your password at the bottom of this page.
- Download and unzip the Subtext 1.9 binaries into a new directory
parallel to your current installation. For example, on my server
I host my blog in the
d:\Websites\Haacked.com\directory. When upgrading to Subtext 1.9, I unzipped the distribution to the following pathd:\Websites\Haacked.com.1.9\. - Merge any customizations from your old web.config file into the
new web.config file. Be sure to note that some settings have
moved. For example, the connection string has been moved into the
<ConnectionStrings>section. Also take a look at any new settings you may be interested in. - Copy all your images, videos, audio files and any other non-Subtext files and customizations into the appropriate place in the new directory.For example, I copied the images folder as well as my own Demos folder which contained some demo code on my site into the Haacked.com.1.9 folder.
- Now in IIS Manager, configure your existing site to use ASP.NET 2.0 and point it to your new directory. For details, see the section at the bottom of this post. You may need to change the Application Pool your site runs in if you are running Windows 2003.
- Visit your website and follow the instructions. At this point, the normal web-based upgrade wizard should kick in, asking you to login to the HostAdmin tool and click the upgrade button. This will upgrade your database schema and stored procedures.
- Make sure to reverse the change you made in step 2! Subtext does not require DBO permissions for normal operations. The user that Subtext uses to connect to your database should just be in the public group.
For Users With Hosted Solutions Such as WebHost4Life
Unfortunately I am not familiar with the procedure that the various hosting providers use to upgrade a site from ASP.NET 1.1 to ASP.NET 2.0. If the upgrade happens on the same machine that your site is currently hosted in, the upgrade may bring down your site for a short bit. You may have to coordinate the above steps with a technician at your hosting company, except for the following changes.
- Step 4: Download and unzip the Subtext 1.9 binaries to your local machine.
- Step 6: Have your hosting support technician upgrade your site to ASP.NET 2.0
- Step 7: Copy your local files over to your hosting provider.
Configuring IIS for ASP.NET 2.0
To configure a website in IIS for ASP.NET 2.0, right click on the website in the IIS Manager tool and select properties. Click on the ASP.NET tab in the dialog box. It should look something like this…
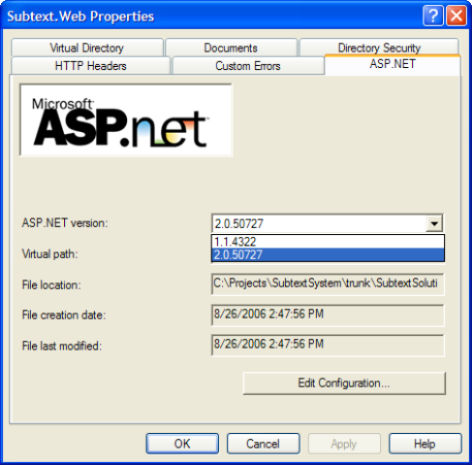
Makes sure to select 2.0.50727 in the ASP.NET version dropdown.
On Windows 2003, I created a separate Application Pool for my ASP.NET 2.0 websites. To select the Application Pool for a website, cilck on the Virtual Directory tab and select the Application Pool in the dropdown at the bottom of the dialog as in the following screenshot.

Good luck and smooth sailing!
Comments
0 responses