Quickstart Guide To Shell Services In SourceForge
Consider this a more advanced followup to my Quickstart Guide to Open Source Development With CVS and SourceForge.
Intro
So you have finally decided to become a flower power card carrying community loving member of an an open source project that happens to be hosted on Sourceforge. Good for you! Unfortunately, someone might expect you to actually contribute something. Suppose they give you the responsibility to update the project Home Page. SourceForge provides the ability to host project home pages within SourceForge itself, but how do you access those files? This guide will help you with that so you can earn the respect of your peers and graduate from n00b to contributor.
First, it is important to understand that you will not be able to fallback on your trusty FTP client to move your files to your SourceForge website. If you are a Windows developer unnaccustomed to the *nix-y ways of doing things (*nix == unix, linux, anyothernix…), it’s time to get the hands a bit dirty. But don’t you worry, I’ll present the most Windowsy manner to get *nixy tasks done.
To access files on SourceForge, you are going to have connect to their shell services via an SSH session. SSH is a protocol which is analogous to, but different from FTP. Some applications adopt this protocol to provide secure communication between servers, such as SFTP (secure FTP) and SCP (secure copy). Applications which are not built on SSH can still use these services by communicating through an SSH tunnel.
WinSCP To Securely Transfer Files
The quick and easy way to do this for those of us who don’t work with *nix every day is to download and install WinSCP. WinSCP is both a SFTP (SSH File Transfer Protocol) and SCP (Secure Copy Protocol) client.
SourceForge Project Shell Info
Before you start with WinSCP, you’ll need some information about your SourceForge project handy. Remember, as with all things *nix, everything is case sensitive.
- Hostname: shell.sourceforge.net (or shell.sf.net)
- Username: as used to login to the SourceForge.net web site.
- Password: Password authentication is not supported. You must configure a SSH key pair for authentication.
- Project Group Directory: /home/groups/P/PR/PROJECTNAME
- Project Web Directory (root): /home/groups/P/PR/PROJECTNAME/htdocs
- Project Web CGI Script Directory: /home/groups/P/PR/PROJECTNAME/cgi-bin
For example, these values for me on Subtext are…
- Hostname: shell.sourceforge.net (or shell.sf.net)
- Username: haacked
- Password: leave blank
- Project Group Directory: /home/groups/s/su/subtext
- Project Web Directory (root): /home/groups/s/su/subtext/htdocs
- Project Web CGI Script Directory: /home/groups/s/su/subtext/cgi-bin
Using WinSCP
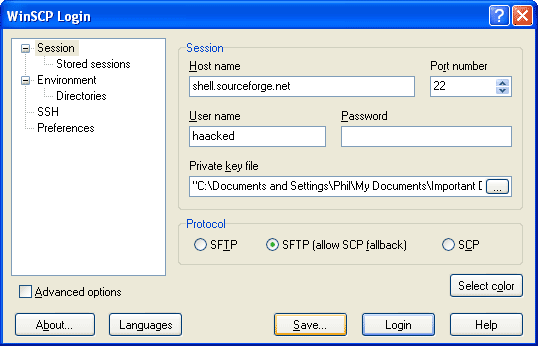
When WinSCP first starts, you will see a dialog box that requests various host information. Enter the following details in to the provided dialog box:
- Host name: shell.sourceforge.net (or cf-shell.sourceforge.net)
- Port number: 22
- User name: YOUR_USERNAME
- Password: leave this field blank
- Private key file: Click on the “…” button to browse for the PuTTY private key you created previously following the instructions here. Load the desired key.
- Protocol: SFTP (allow SCP fallback)
Below is a screenshot of this dialog and how I entered the fields.

Click Save and choose the default for the session name which should matche the hostname you entered previously (USERNAME@shell.sourceforge.net or USERNAME@cf-shell.sourceforge.net).
To start the session, click the Login button. The first time you do this for a session, you will get a dialog asking to compare the SSH host key fingerprint. This is to make sure you are connecting to the site you think you are connecting to.
If you followed the instructions as I described, you should see the following key:
4c:68:03:d4:5c:58:a6:1d:9d:17:13:24:14:48:ba:99
If yours differs, compare it against the list of keys here. If it does not match, please contact SourceForge.net staff by submitting a Support Request.
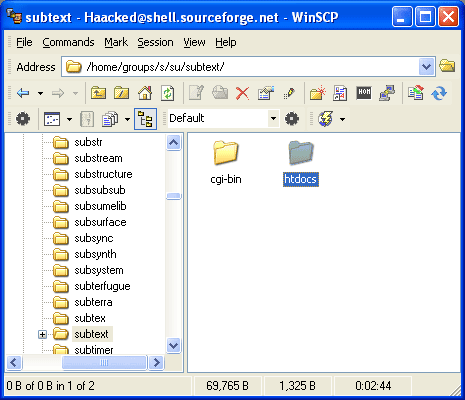
Once you are logged in, you can browse your project directories. Browse to your project root and if you choose the Explorer view as I did, it should look like the screenshot below.

Place your web files within the hcp directory. Unfortunately at the time of this writing, SourceForge won’t run .NET code, but it does support cgi as well as PHP and MySQL.
Comments
10 responses