Creating a Custom ASP.NET MVC Project Template
UPDATE: I have an example Really Empty project template up on GitHub you can look at. I improved on this technique a bit in that one.
When you create a new ASP.NET MVC 3 project, the new project wizard dialog contains several options for different MVC project templates:
- Empty
- Internet Application
- Intranet Application (new in the April 2011 Tools update)
There’s a lot of white space in that dialog. To many of you, all that unsullied territory smells like opportunity. When I talk about this dialog, I go to great pains to tell folks that, yes!, you too can extend that dialog and add your own project templates in there.
If you wanted to, you could have your own ASP.NET MVC 3 project template configured exactly the way you want. Hate the default template? Make your own!
The only problem is, I keep telling you that you can extend it, but sadly I never told you how. But that’s about to change!
I don’t expect that a large number of people will want to do this, which is one reason we haven’t spent a large amount of time making it easy (though that may change in the future). But for the few of you impatient masochists who want to add your own custom templates now, this blog post will walk you through the hacking around it takes to make it happen.
Imitation is the sincerest form of productivity
The easiest way to get started is to simply copy and modify an existing project template. For example, I looked in the following directory:
C:\Program Files (x86)\Microsoft Visual Studio 10.0\Common7\IDE\ProjectTemplates\CSharp\Web\1033
on my machine and stole *ahem* borrowed the project template named
MvcWebApplicationProjectTemplatev3.01.cshtml.zip. Note that the 1033
folder is for English (en-US) templates. For other languages, you may
need to look in a different folder.
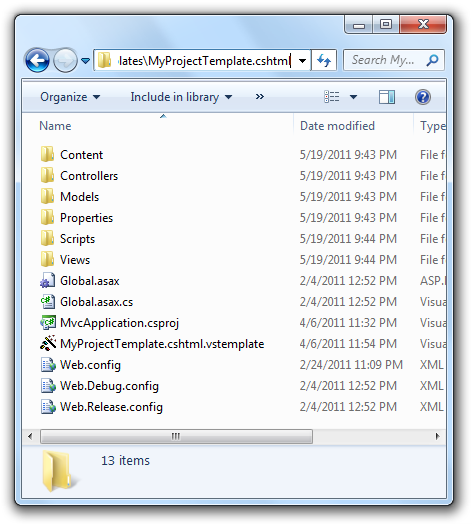
I then renamed it to MyProjectTemplate.cshtml.zip and extracted the contents into a folder so I could make some modifications to its contents.
When you extract the contents, you’ll want to rename the .vstemplate file to match the name of the template you chose. In my case, I renamed MvcWebApplicationProjectTemplatev3.01.cshtml.vstemplate to MyProjectTemplate.cshtml.vstemplate.
Open up the .vstemplate file in NotePad and make sure to change the
TemplateID element value to something unique.
You can change any of the contents of the template folder now, but be very careful to make sure that any additions or deletions of content are reflected in the .vstemplate file. That file is a manifest of all the files within the VSIX package that makes up the project template. Also make sure that the .csproj file reflects those changes as well, to ensure any new files you add to the template are properly referenced in the project.
Pre-installed NuGet packages
UPDATE: The upcoming NuGet 1.5 feature will provide support for this feature in a way that doesn’t require the following harsh warning. Marcin Dobosz has a blog post detailing the feature.
Warning: I probably shouldn’t show you this next section and some of my co-workers may chide me on this. But if you promise to be responsible and pay close attention to the information and context for that information I’m about to show you, I’ll do it anyways and trust you not to inundate us with support calls when this blows your hand off.
The ASP.NET MVC 3 Tools Update includes very limited support for project templates that include NuGet packages. We originally wanted it to be very extensible, but ran out of time and imposed some severe limitations on the feature, hence the caution.
If you scroll to the bottom of the .vstemplate file, you’ll notice the following section:
<WizardData>
    <packages>
        <package id="jQuery" version="1.5.1" />
        <package id="jQuery.vsdoc" version="1.5.1" />
        <package id="jQuery.Validation" version="1.8.0" />
        <package id="jQuery.UI.Combined" version="1.8.11" />
        <package id="EntityFramework" version="4.1.10331.0" />
        <package id="Modernizr" version="1.7" />
    </packages>
</WizardData>
That is the list of NuGet packages that the MVC 3 project template installs when you invoke the project template.
But as I mentioned, there are two major limitations:
- The package must exist in the %ProgramFiles%\Microsoft ASP.NET\ASP.NET MVC 3\Packages folder. MVC 3 doesn’t go searching online for them.
- The
versionattribute of the package in the<package>element is required and is an exact match.
If you are fine with these limitations, you can modify this section of your custom project template to install the NuGet packages you care about. Just make sure they exist in the MVC 3 packages folder like I mentioned.
Once you are done making your changes, zip up the contents of the folder with the same file name you had before.
Registering your project template
At this point, all you need to do is copy the project template to the right location and add the appropriate registry entries. For extra credit, you can write an installer (MSI) that does all this for you.
The place to copy your template is the same place I mentioned previously, C:\Program Files (x86)\Microsoft Visual Studio 10.0\Common7\IDE\ProjectTemplates\CSharp\Web\1033
Once the template is there, you’ll need to setup the correct registry settings.

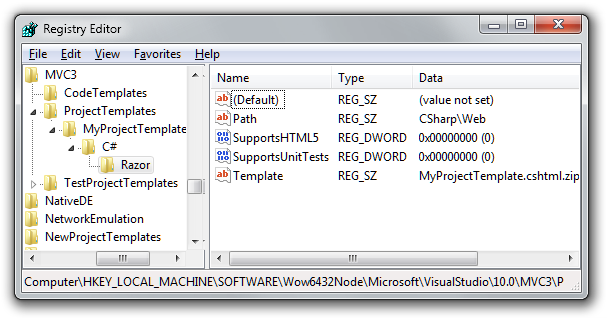
Since I’m lazy, I put these registry settings in a .reg file to make it easy to install. You’ll just need to modify the settings within the .reg file to match your project template.
32-bit
Windows Registry Editor Version 5.00

[HKEY_LOCAL_MACHINE\SOFTWARE\Microsoft\VisualStudio\10.0\MVC3\
    ProjectTemplates\MyProjectTemplate]
"Title"="My Project Template"
"Description"="This is the coolest project template EVAR MADE."

[HKEY_LOCAL_MACHINE\SOFTWARE\Microsoft\VisualStudio\10.0\
    MVC3\ProjectTemplates\MyProjectTemplate\C#\Razor]
"Path"="CSharp\\Web"
"SupportsHTML5"=dword:00000000
"SupportsUnitTests"=dword:00000000
"Template"="MyProjectTemplate.cshtml.zip"
64-bit
Windows Registry Editor Version 5.00

[HKEY_LOCAL_MACHINE\SOFTWARE\Wow6432Node\Microsoft\VisualStudio\10.0\MVC3\
    ProjectTemplates\MyProjectTemplate]
"Title"="My Project Template"
"Description"="This is the coolest project template EVAR MADE."

[HKEY_LOCAL_MACHINE\SOFTWARE\Wow6432Node\Microsoft\VisualStudio\10.0\
    MVC3\ProjectTemplates\MyProjectTemplate\C#\Razor]
"Path"="CSharp\\Web"
"SupportsHTML5"=dword:00000000
"SupportsUnitTests"=dword:00000000
"Template"="MyProjectTemplate.cshtml.zip"
The important thing to note are the options in the second registry section:
- Path – Relative path from the ProjectTemplates folder. For C# projects, enter “CSharp\\Web”. For VB.NET use “VisualBasic\\Web”
- SupportsHTML5 –Whether or not the project template supports
HTML5. If set to 1, then the HTML 5 checkbox is enabled. That
checkbox sets a project template variable,
$usehtml5$. You can look at the default /Views/Shared/_Layout.cshtml inside of MvcWebApplicationProjectTemplatev3.01.cshtml.zipfor an example of this. - SupportsUnitTests – This allows you to associate a unit test project template with your project template.
- Template – the name of your project template file.
The last step is to run the command devenv /installvstemplates to
force Visual Studio to recognize the project templates.
I wrote a batch file, install.bat, when combined with the .reg file, that automates these steps.
cd %~dp0
regedit.exe /s project-template.reg
xcopy MyProjectTemplate.cshtml.zip "C:\Program Files (x86)\Microsoft Visual Studio   10.0\Common7\IDE\ProjectTemplates\CSharp\Web\1033" /Y
devenv /installvstemplates
For your convenience, I packaged up the necessary files in a zip file. Unzip the file, and run install.bat and you’ll see a new project template when you create a new ASP.NET MVC 3 project.

Pretty cool, eh?
By the way, I’m working on a book about ASP.NET MVC 3 with Brad Wilson, Jon Galloway, and K. Scott Allen. We’ve re-written large portions of the book in light of the new features that were released in ASP.NET MVC 3. If you’re interested, feel free to pre-order our book on Amazon.com!

Comments
42 responses