
ASP.NET Supervising Controller (Model View Presenter) From Schematic To Unit Tests to Code
UPDATE: For a more full featured implementation of this pattern for
ASP.NET Web Forms, check out the WebForms
MVP project! It’s available as
a NuGet package! Install-Package WebFormsMVP
Martin Fowler recently split the Model-View-Presenter pattern into two new patterns, Supervising Controller and Passive View. They are pretty much two different flavors of the MVP pattern differentiated by how much application logic is placed within the view.
The goal of this post is to demonstrate an end-to-end walk-through of the process of implementing the Supervising Controller pattern starting with a rough schematic. My goal is not explain the Supervising Controller pattern in detail but to help others take it out of the sounds nice in theory bucket and move it into I can and will use this in a real project, I promise bucket. There are many ways to implement the pattern for any given scenario, so keep in mind that this is not the one true way, just one way.
The Schematic
For this fictional scenario, I might as well pick an interface that I am familiar with, a blogging engine. In particular I will create a very very simple page to edit the body of a blog post and add and remove tags associated with the post. In trying to keep the example simple, I leave out all minor and extraneous details such as a title for the blog post. How important is a title, really?
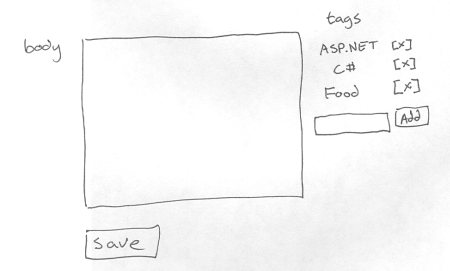
The chicken scrawl above is a hand-drawn quick and dirty schematic for the user interface. No surprises here. There is a text area for entering the body of the blog post. There is a list of existing tags for the current post on the right. At the bottom of the list of tags is a text box. In order to add a new tag, the user can simply type in the name of the tag and click the add button. This will add a new tag to the list and associate it to the blog post. Note that when adding tags, any changes to the blog post should not be lost. The user can also remove tags by clicking the [x] next to the tag name.
When the user is finally ready to save the blog entry, the user clicks the Save button.
Defining the View
The next step is to analyze the schematic and define a view interface that can appropriately represent this interface. For the sake of this discussion, I will implement a single view that will represent this entire page. An alternative approach would be to break the page into two user controls and implement each user control independently with its own view and presenter.
Examining the schematic reveals what properties we need to populate the view interface. Obviously the view should have a getter and setter for the body text. Probably good to have a property that returns a collection of tags as well. We will want a getter and setter for the tag textbox, and a an event each for the buttons.
The entire process of defining a view interface may take multiple
iterations. I am going to skip that long process (mainly because I
cannot bear to type that much) and show you what I ended up with. Before
I created the specific view interface, I defined a more generic base
interface, IView. This is the base interface I will use for all my
ASP.NET views.
public interface IView
{
    event EventHandler Init;

    event EventHandler Load;

    bool IsPostBack { get; }

    void DataBind();

    bool IsValid { get;}
}
One thing to notice is this interface defines two events, Init and
Load. Most implementations of MVP that I’ve seen place an Initialize
method on the Presenter/Controller class that every concrete view
implementation must remember to call at the right time.
But when you have an ASP.NET Control or Page implement this
interface, you don’t have to remember to have every concrete view call
anything and you don’t have to implement these interfaces. It is already
done for you by the ASP.NET runtime. You get the initialization call
for free. Less code is better code I always say.
One common complaint with such an approach is that events on an interface are hard to test. I thought the same until I discovered Rhino Mocks. Now testing events is quite easy.
Here is the final view interface for the blog post edit page.
public interface IPostEditView : IView
{
    string BlogPostBody { get;set;}

    ICollection<Tag> Tags { get; set; }

    string NewTag { get; set;}

    int BlogPostId {get;}

    event EventHandler PostSaved;

    event EventHandler TagCreated;

    event EventHandler<TagRemovedEventArgs> TagRemoved;
}
Again, no surprises. One thing to note is the BlogPostId property. In
this scenario, it is the view that is responsible for figuring out which
blog post to edit. This makes sense in a lot of scenarios as the id may
be coming in from a query string or via some other means. However, in
other scenarios, you might want the controller to be responsible for
figuring out which post to edit.
Writing a Unit Test
Now our next major task is to implement the presenter. But before we do that, we should start off with a basic unit test. The first thing I want to test is that the presenter properly attaches to the events on the view. The following is the test I wrote. Notice that there is some code in the SetUp method that I am not presenting here. You can see that code later.
[Test]
public void VerifyAttachesToViewEvents()
{
    viewMock.Load += null;
    LastCall.IgnoreArguments();
    viewMock.PostSaved += null;
    LastCall.IgnoreArguments();
    mocks.ReplayAll();
    new PostEditController(viewMock,
      this.dataServiceMock);
    mocks.VerifyAll();
}
Defining the presenter {.clear}
With the test in place, I can move forward and start implementing the
controller. In practice, I only implement enough to get my test to pass,
at which point I write another test and the cycle continues. In order
not to bore you, I will skip ahead and show you the entire Controller
implementation.
public class PostEditController
{
    BlogPost blogPost;
    IPostEditView view;
    IBlogDataService dataService;

    //Attaches this presenter to the view’s events.
    public PostEditController(IPostEditView view,
      IBlogDataService dataService)
    {
        this.view = view;
        this.dataService = dataService;
        SubscribeViewToEvents();
    }

    void SubscribeViewToEvents()
    {
        view.Load += OnViewLoad;
        view.PostSaved += OnPostSaved;
        view.TagCreated += OnTagCreated;
        view.TagRemoved += OnTagRemoved;
    }

    void OnTagRemoved(object sender, TagRemovedEventArgs e)
    {
        this.dataService.RemoveTag(e.Title);
        this.blogPost = this.dataService.GetById(view.BlogPostId);
        view.Tags = blogPost.Tags;
        view.DataBind();
    }

    void OnPostSaved(object sender, EventArgs e)
    {
        Save();
    }

    void OnTagCreated(object sender, EventArgs e)
    {
        CreateAndAddTag();
    }

    void OnViewLoad(object sender, EventArgs e)
    {
        if (!view.IsPostBack)
        {
            LoadViewFromModel();
            view.DataBind();
        }
    }

    public Tag GetTagById(int id)
    {
        //Normally we’d probably just have a method
        //of the service just return this.
        foreach (Tag tag in this.blogPost.Tags)
        {
            if(tag.Id == id)
                return tag;
        }
        return null;
    }

    void LoadViewFromModel()
    {
        this.blogPost = this.dataService.GetById(view.BlogPostId);
        view.Tags = blogPost.Tags;
        view.BlogPostBody = blogPost.Description;
    }

    void Save()
    {
        this.dataService.Save(view.BlogPostId, view.BlogPostBody);
        LoadViewFromModel();
        view.DataBind();
    }

    void CreateAndAddTag()
    {
        this.dataService.AddTag(view.NewTag);
        //Need to rebind the tags. retrieve tags from db.
        this.blogPost = this.dataService.GetById(view.BlogPostId);
        view.Tags = blogPost.Tags;
        view.NewTag = string.Empty;
        view.DataBind();
    }
}
Implementing the View {.clear}
I have yet to implement the ASP.NET page that will implement the view, yet I am able to write a bunch of unit tests (which I will provide) against the presenter to make sure it behaves appropriately. This is the benefit of this pattern in that much more of the UI logic is now testable.
Implementing the ASP.NET page is pretty straight forward. I drop a few
controls on a page, wire up the controls declaratively to their data
sources, and then implement the IPostEditView interface. As much as
possible, I want to leverage ASP.NET declarative data binding. The point
isn’t to force developers to write more code. Here is the code behind
for the page. I apologize for the code heaviness of this article.
public partial class _Default : System.Web.UI.Page, IPostEditView
{
    PostEditController controller;
    ICollection<Tag> tags;

    public _Default()
    {
         this.controller =
             new PostEditController(this, new BlogDataService());
    }

    protected void Page_Load(object sender, EventArgs e)
    {
    }

    public void Update()
    {
        DataBind();
    }

    public int BlogPostId
    {
        get { return GetBlogId(); }
    }

    private int GetBlogId()
    {
        string idText = Request.QueryString["id"];
        int result;
        if(int.TryParse(idText, out result))
        {
            return result;
        }
        return 1;
    }

    public string BlogPostBody
    {
        get { return this.txtDescription.Text; }
        set { this.txtDescription.Text = value; }
    }

    public ICollection<Tag> Tags
    {
        get { return this.tags; }
        set { this.tags = value; }
    }

    public string NewTag
    {
        get { return this.txtNewTag.Text; }
        set { this.txtNewTag.Text = value; }
    }

    protected void OnSaveClick(object sender, EventArgs e)
    {
        EventHandler postSaved = this.PostSaved;
        if (postSaved != null)
            postSaved(this, EventArgs.Empty);
    }

    protected void OnAddTagClick(object sender, EventArgs e)
    {
        EventHandler tagCreated = this.TagCreated;
        if (tagCreated != null)
            tagCreated(this, EventArgs.Empty);
    }

    void OnTagDeleteClick(object source,
                          RepeaterCommandEventArgs e)
    {
        EventHandler<TagRemovedEventArgs> tagRemoved
        = this.TagRemoved;
        if(tagRemoved != null)
        {
            string tagTitle
          = ((Literal)e.Item.FindControl("ltlTag")).Text;
            tagRemoved(this, new TagRemovedEventArgs(tagTitle));
        }
    }

    public event EventHandler TagCreated;

    public event EventHandler PostSaved;

    public event EventHandler<TagRemovedEventArgs> TagRemoved;

    protected override void OnInit(EventArgs args)
    {
        this.btnSave.Click += OnSaveClick;
        this.btnNewTag.Click += OnAddTagClick;
        this.rptTags.ItemCommand += OnTagDeleteClick;
    }
}
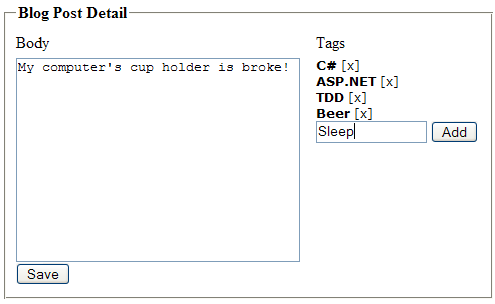
When I finally compile all this and run it, here is the view I see in the browser.
The benefits of this exercise become clear when you find bugs in the UI logic. Even while going through this exercise, I would find minor little bugs that I could expose by writing a failing unit test. I would then fix the bug which would cause the test to pass. That is a great way to work!
As an exercise for the reader, I left in a bug. When you leave the tag
textbox blank, but click the Add button, it adds a blank tag. We
should just ignore a blank tag. Try writing a unit test that fails
because it assumes that a tag will not be added when the NewTag field
is left blank. Then make the test pass by fixing the code in the
Controller class. Finally, verify that by fixing the unit test, that
the actual UI works by trying it out in the browser.
I apologize for glossing over so many details, but I did not want to turn this post into a book. If you want to read more on MVP, check out Bill McCafferty’s detailed treatment at the CodeProject. Also worth checking out is Jeremy D. Miller’s post on Model View Presenter.
Finally, to really understand what I am trying to present here, I encourage you to download the source code and try it out. I have included extensive comments and unit tests. This requires the free Web Application Project Model from Microsoft to compile and run.
The code doesn’t require a database connection, instead simulating a database via some static members. Please understand, that code is just a simulation and is not meant to be emulated in production code.
Comments
90 responses