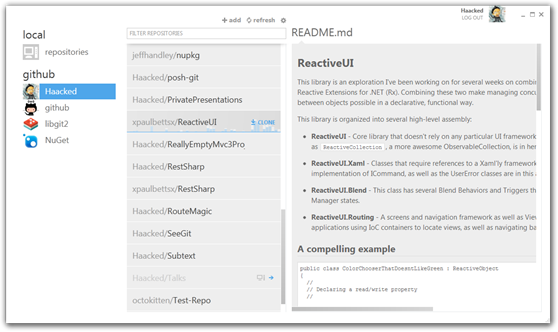
Introducing GitHub For Windows
For the past several months I’ve been working on a project with my amazing cohorts, Paul, Tim, and Adam, and Cameron at GitHub. I’ve had the joy of learning new technologies and digging deep into the inner workings of Git while lovingly crafting code.
But today, is a good day. We’ve called the shipit squirrel into action once again! We all know that the stork delivers babies and the squirrel delivers software. In our case, we are shipping GitHub For Windows! Check out the official announcement on the GitHub Blog. GitHub for Windows is the easiest and best way to get Git on your Windows box.
If you’re not familiar with Git, it’s a distributed version control system created by Linus Torvalds and his merry Linux hacking crew. If you are familiar with Git, you’ll know that Git has historically been a strange and uninviting land for developers on the Windows platform. I call this land, Torvaldsia, replete with strange incantations required to make things work.
Better Git on Windows
In recent history, this has started to change due to the heroic efforts of the MSysGit maintainers who’ve worked hard to provide a distribution of Git that works well on Windows.
GitHub for Windows (or GH4W for short) builds on those efforts to provide a client to Git and GitHub that’s friendly, approachable, and inviting. If you’re a Git noob, this is a good place to start. If you’re a Git expert on Windows, at the very least, GitHub for Windows can still be a useful part of your workflow. Just visit http://windows.github.com/ and click the big green download button.
In this post, I’ll give a brief rundown of what gets installed and how to customize the shell for you advanced users of Git.
As the GitHub blog post shows, you can easily access and clone repositories on GitHub either by clicking the Clone in Windows link from a repository on GitHub.com itself, or by cloning a repository associated with your account directly from the application.
The application allows you to browse, make, revert, and rollback commits. You can also find, create, publish, merge, and delete branches. I’ll go into more details about this sort of thing in future blog posts. In this post, I want to talk about what gets installed and then cover customizing the Git shell we include for you advanced Git users.
Installation
If you’ve ever read the old guide to installing msysgit for Windows on the GitHub help page, you’d know there’s a lot of configuration steps involved. We use ClickOnce to install the application and to provide Google Chrome style silent, automated, updates that install in the background to keep it up-to-date.
GH4W is a sandboxed installation of Git and the GitHub application that takes care of all that configuration. Please note, it will not mess with your existing Git environment if you have one. There will be two shortcuts installed on your machine, one for the GH4W application and another labeled “Git Shell”.
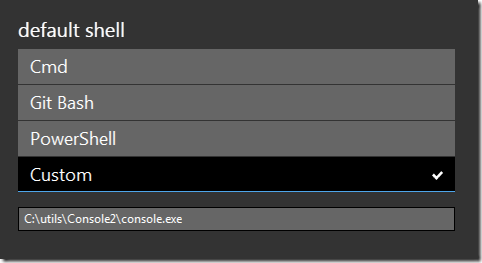
The Git Shell shortcut launches the shell of your choice as configured within the GH4W application’s options menu. You can also launch the shell from within the application for any given repository.
By default, this is PowerShell but you can change it to Bash, Cmd, or even a custom option, which I’ll cover in a second.
Posh-Git and PowerShell
When you launch the shell, you’ll notice that the PowerShell option includes Posh-Git by Keith Dahlby. I’ve written about Posh-Git before and we love it so much we included it in the box. This is an even easier way to get Posh-Git on your machine and stay up to date with the latest version.
You might notice that our PowerShell icon doesn’t execute your existing
PowerShell profile. We worried about conflicts with existing Posh-Git
installs or whatever you might have. Instead, we execute a custom
profile script if it exists, GitHub.PowerShell_profile.ps1.
Just create one in the same directory as your $profile script. In my
case, it’s in the C:\Users\Haacked\Documents\WindowsPowerShell
directory.
Custom Shell
I’m a huge fan of pimping out my command line shell with
Console2.
As the previous screenshot shows, you can specify a custom shell like
Console2. However, when you launch a custom shell, it won’t load our
profile script and also won’t load the version of Posh-Git that we
include. However, we added an environment you can check within the
Microsoft.Powershell_profile.ps1 script.
# If Posh-Git environment is defined, load it.
if (test-path env:posh_git) {
    . $env:posh_git
}
The benefit here, as I mentioned earlier is that you won’t have to worry about keeping Posh-Git up-to-date since we’ll do it for you as part of GH4W updates.
What’s Next?
I’ll try and cover a few other topics later. For example, GH4W works with local Git repositories as well as those from other hosts. I’ll also try and cover how I fit GitHub for Windows into my Git workflow developing with Visual Studio. If you have other ideas for topics you’d like me to cover, let me know.
In the meanwhile, try it out!
If you have feedback, mention @github on Twitter (hashtag #gh4w). We make sure to read every mention on Twitter. If you find a bug, submit it to support@github.com. Every email is read by a real person.
But of course, I expect many of you will comment right here and I’ll do my best to keep up with responses because I love you all.


Comments
96 responses