Writing a Recipe for ASP.NET MVC 4 Developer Preview
NOTE: This blog post covers features in a pre-release product, ASP.NET MVC 4 Developer Preview. You’ll see we call out those two words a lot to cover our butt. The specifics about the feature will change and this post will become out-dated. You’ve been warned.
 All good recipes call for a significant amount of garlic.
Introduction
Last week I spoke at the //BUILD conference on building mobile web applications with ASP.NET MVC 4. In the talk, I demonstrated a recipe I wrote that automates the process to create mobile versions of desktop views.
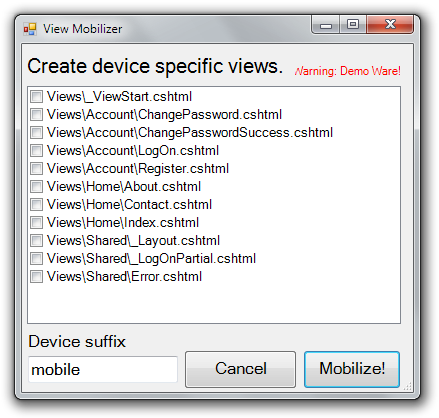
Recipes are a great way to show off your lack of UI design skills like me!
In this blog post, I’ll walk through the basic steps to write a recipe. But first, what exactly is a recipe?
Obviously I’m not talking about the steps it takes to make a meatloaf surprise. In the roadmap, I described a recipe as:
An ASP.NET MVC 4 recipe is a dialog box delivered via NuGet with associated user interface (UI) and code used to automate a specific task.
If you’re familiar with NuGet, you know that a NuGet package can add new Powershell commands to the Package Manager Console. You can think of a recipe as a GUI equivalent to the commands that a package can add.
It fits so well with NuGet that we plan to add recipes as a feature of NuGet (probably with a different name if we can think of a better one) so that it’s not limited to ASP.NET MVC. We did the same thing with pre-installed NuGet packages for project templates which started off as a feature of ASP.NET MVC too. This will allow developers to write recipes for other project types such as Web Forms, Windows Phone, and later on, Windows 8 applications.
Getting Started
Recipes are assemblies that are dynamically loaded into Visual Studio by the Managed Extensibility Framework, otherwise known as MEF. MEF provides a plugin model for applications and is one of the primary ways to extend Visual Studio.
The first step is to create a class library project which compiles our recipe assembly. The set of steps we’ll follow to write a recipe are:
- Create a class library
- Reference the assembly that contains the recipe framework types. At this time, the assembly is Microsoft.VisualStudio.Web.Mvc.Extensibility.1.0.dllbut this may change in the future.
- Write a class that implements the
IRecipeinterface or one of the interfaces that derive fromIRecipesuch asIFolderRecipeorIFileRecipe. These interfaces are in theMicrosoft.VisualStudio.Web.Mvc.Extensibility.Recipesnamespace. The Developer Preview only supports theIFolderRecipeinterface today. These are recipes that are launched from the context of a folder. In a later preview, we’ll implementIFileRecipewhich can be launched in the context of a file. - Implement the logic to show your recipe’s dialog. This could be a Windows Forms dialog or a Windows Presentation Foundation (WPF) dialog.
- Add the MEF
ExportAttributeto the class to export theIRecipeinterface. - Package up the whole thing in a NuGet package and make sure the assembly ends up in the recipes folder of the package, rather than the usual lib folder.
The preceding list of steps itself looks a lot like a recipe, doesn’t it? It might be natural to expect that I wrote a recipe to automate those steps. Sorry, no. But what I did do to make it easier to build a recipe was write a NuGet package.
Why didn’t I write a recipe to write a recipe (inception!)? Recipes add a command intended to be run more than once during the life of a project. But that’s not the case here as setting up the project as a recipe is a one-time operation. In this particular case, a NuGet package is sufficient because it doesn’t make sense to convert a class library project into a recipe over and over gain.
That’s the logic I use to determine whether I should write a recipe as opposed to a regular NuGet package. If it’s something you’ll do multiple times in a project, it may be a candidate for a recipe.
A package to create a recipe
To help folks get started building recipes, I wrote a NuGet package, AspNetMvc4.RecipeSdk. And as I did in my //BUILD session, I’m publishing this live right now! Install this into an empty Class Library project to set up everything you need to write your first recipe.
The following screenshot shows an example of a class library project after installing the recipe SDK package.
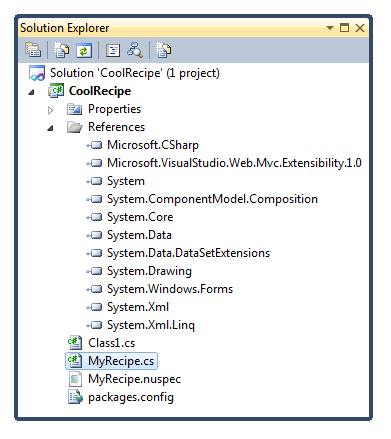
Notice that it adds a reference to the Microsoft.VisualStudio.Web.Mvc.Extensibility.1.0.dll assembly and adds a MyRecipe.cs file and a MyRecipe.nuspec file. It also added a reference to System.Windows.Forms.
Feel free to rename the files it added appropriately. Be sure to edit the MyRecipe.nuspec file with metadata appropriate to your project.
The interesting stuff happens within MyRecipe.cs. The following shows the default implementation added by the package.
using System;
using System.ComponentModel.Composition;
using System.Drawing;
using Microsoft.VisualStudio.Web.Mvc.Extensibility;
using Microsoft.VisualStudio.Web.Mvc.Extensibility.Recipes;

namespace CoolRecipe {
    [Export(typeof(IRecipe))]
    public class MyRecipe : IFolderRecipe {
        public bool Execute(ProjectFolder folder) {
            throw new System.NotImplementedException();
        }

        public bool IsValidTarget(ProjectFolder folder) {
            throw new System.NotImplementedException();
        }

        public string Description {
            get { throw new NotImplementedException(); }
        }

        public Icon Icon {
            get { throw new NotImplementedException(); }
        }

        public string Name {
            get { throw new NotImplementedException(); }
        }
    }
}
Most of these properties are self explanatory. They provide metadata for a recipe that shows up when a user launches the Add recipe dialog.
The two most interesting methods are IsValidTarget and Execute. The
first method determines whether the folder that the recipe is launched
from is valid for that recipe. This allows you to filter recipes. For
example, suppose your recipe only makes sense when launched from a view
folder. You can implement that method like so:
public bool IsValidTarget(ProjectFolder folder) {
    return folder.IsMvcViewsFolderOrDescendent();
}
The IsMvcViewsFolderOrDescendant is an extension method on the
ProjectFolder type in the
Microsoft.VisualStudio.Web.Mvc.Extensibility namespace.
The general approach we took was to keep the ProjectFolder interface
generic and then add extension methods to layer on behavior specific to
ASP.NET MVC. This provides a nice simple façade to the Visual Studio
Design Time Environment (or DTE). If you’ve ever tried to write code
against the DTE, you’ll appreciate this.
In this particular case, I recommend that you make the method always
return true for now so your recipe shows up for any folder.
The other important method to implement is Execute. This is where the
meat of your recipe lives. The basic pattern here is to create a Windows
Form (or WPF Form) to display to the user. That form might contain all
the interactions that a user needs, or it might gather data from the
user and then perform an action. Here’s the code I used in my MVC 4
Mobilizer recipe.
public bool Execute(ProjectFolder folder) {
    var model = new ViewMobilizerModel(folder);
    var form = new ViewMobilizerForm(model);

    var result = form.ShowDialog();
    if (result == DialogResult.OK) {
        // DO STUFF with info gathered from the form
    }
    return true;
}
I create a form, show it as a dialog, and when it returns, I do stuff with the information gathered from the form. It’s a pretty simple pattern.
Packaging it up
Packaging this up as a NuGet package is very simple. I used NuGet.exe to run the following command:
nuget pack MyRecipe.nuspec
If it were any easier, it’d be illegal! I can now run the nuget push
command to upload the recipe package to
NuGet.org and make it
available to the world. In fact, I did just that live during my
presentation at BUILD.
Using a recipe
To install the recipe, right click on the solution node in Solution Explorer and select Manage NuGet Packages.
Find the package and click the Install button. This installs the NuGet package with the recipe into the solution.
To run the recipe, right click on a folder and select Add > Run
Recipe.
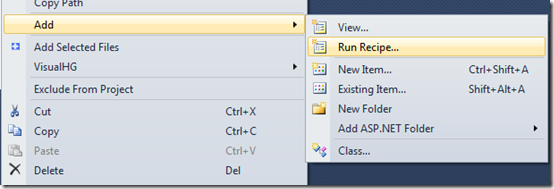
Right now you’re probably thinking that’s an odd menu option to launch a recipe. And now you’re thinking, wow, did I just read your mind? Yes, we agree that this is an odd menu option. Did I mention this was a Developer Preview? We plan to change how recipes are launched. In fact, we plan to change a lot between now and the next preview. At the moment, we think moving recipes to a top level menu makes more sense.
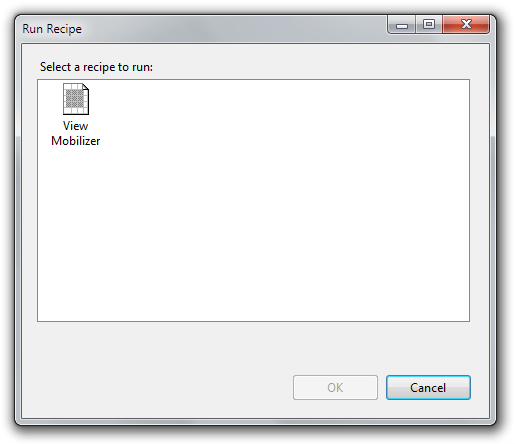
The Run Recipe menu option displays the recipe dialog with a list of installed recipes that are applicable in the current context.
As you can see, I only have one recipe in my solution. Note that a recipe can control its own icon.
Select the recipe and click the OK button to launch it. This then calls
the recipe’s Execute method which displays the UI you implemented.
Get the source!
Oh, and before I forget, the source code for the Mobilizer recipe is available on Github as part of my Code Haacks project!
Comments
18 responses