Text templating using Razor the easy way
As a web guy, I’ve slung more than my fair share of angle brackets over the tubes of the Internet. The Razor syntax quickly became my favorite way of generating those angle brackets soon after its release. But its usefulness is not limited to just the web.
The ASP.NET team designed Razor to generate HTML markup without being tightly coupled to ASP.NET. This opens up the possibility to use Razor in many other contexts other than just a web application.
For example, the help documentation for NuGet.exe is written using the Markdown format that is produced by NuGet.exe. NuGet.exe reflects over its own commands and uses a Razor template to generate the properly formatted output.
The check-in that enabled this caught my eye and prompted me to write this blog post as it’s a very clean approach. I’ll show you how to do the same thing in no time at all.
RazorGenerator
The first step is to install the RazorGenerator extension from the Visual Studio Extension Gallery.
If you haven’t used the Extension Gallery before, within Visual Studio click on the Tools > Extension Manager menu option to launch the Extension Manager dialog. Select the Online tab and type in “RazorGenerator” (without the quotes) in the upper right search bar.
Make sure to install the one named “Razor Generator” (not to be confused with “Razor Single File Generator for MVC”).

Create your application
For my sample application, I created a simple console application and added a reference to the following assemblies:
- System.Web.WebPages.dll
- System.Web.Helpers.dll
- System.Web.Razor.dll
I then added a new text file and named it RazorTemplate.cshtml. You can name yours whatever you want of course.
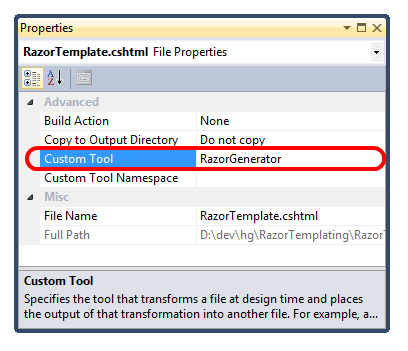
Make sure to set the Custom Tool for the CSHTML file to be “RazorGenerator”. To do that, simply right click on the file and select the Properties menu option. Type in “RazorGenerator” (sans quotes) in the field labeled Custom Tool.

I added the following code within the CSHTML file:
@* Generator : Template TypeVisibility : Internal *@
@functions {
  public dynamic Model { get; set; }
}
<ul>
@foreach (var item in Model) {
  <li>@item.Name (@item.Id)</li>
}
</ul>
That first line is a generator declaration. It’s required to by the Razor Generator. I chose to make the generated template class internal.
The next line starts a functions block. I specify a property for the
template named Model in there. If you’re not a fan of the dynamic
keyword, please don’t freak out. At least not yet.
I simply chose a dynamic property for the purposes of demonstration, but I could have just as easily made it a strongly typed property. Well, not just as easily as I would have had to create a another type first. But you get the idea.
In fact, I could have added multiple properties to this template if so desired. These properties and methods added here will show up in the generated template class.
The next section is simply the usual razor syntax markup you know and love which is written against the property I defined. In case you’re out of practices with Razor, be sure to check out the C# Razor Syntax Quick Reference I wrote a while back.
Render the template
Now all we need to do is instantiate the template, populate the properties we defined in the template with real values, and we’re done!
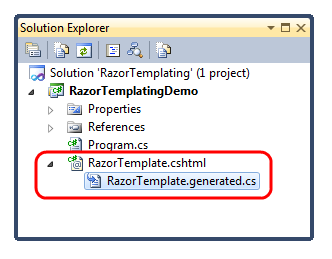
So what exactly are we instantiating? The steps we took up until now results in the Razor file generating a template class. If you expand the CSHTML file, you can see the generated class.

That’s the class we need to instantiate. Here’s some code I added in Program.cs that makes use of this generated template class.
class Program {
    static void Main(string[] args) {
        var template = new RazorTemplate {
            Model = new[] {
                new {Name = "Scott", Id = 1},
                new {Name = "Steve", Id = 2},
                new {Name = "Phil", Id = 3},
                new {Name = "David", Id = 4}
            }
        };
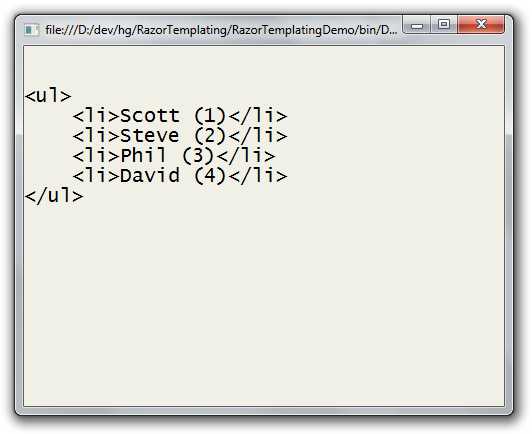
        Console.WriteLine(template.TransformText());
        Console.ReadLine();
    }
}
The code is very straightforward. It simply instantiates an instance of
the RazorTemplate class and sets the Model property (which is the
property I defined within the template) as an array of anonymous
objects.
Again, for demonstration purposes, I’m using a dynamic property to access anonymous objects. You can just as well pass in and render strongly typed properties.
After instantiating the template instance, we simply call the
TransformText method on it and write the response to the console.

Easy as stepping on a Lego block in the dark!
Note that using Razor as a general text templating langage might not always produce the best results. It was heavily geared towards rendering markup (aka angle brackets) which it’s very good at. Your mileage may vary when attempting to render other types of textual output.
In a following post, I’ll show you a cool way I’m using this technique for a library I’ve been working on meant to demonstrate some cool internals of ASP.NET MVC.
Related Razor Resources
Some of what I’ve shown here has been shown before in the context of ASP.NET MVC. Those other posts are worth reading as well. For example…
- David Ebbo shows how to precompile ASP.NET MVC views using RazorGenerator.
- David Ebbo again shows how to unit test those views you just created using RazorGenerator.
- The ever prolific Ebbo started it all off with Turn your Razor helpers into reusable libraries
I hope you find this useful for your text templating needs!
Comments
33 responses