
Installing Ubuntu on Virtual PC for Windows Lovers
I am a total
noob
when it comes to working with Linux. The only experience I have with
Unix is in college when I used to pipe the manual of trn via the
write command to unsuspecting classmates. If I remember correctly,
this is how you do it.
write username | man trn
This would fill the user’s screen with a bunch of text. Always good for a laugh.
Normally, the write command informs the receiver who originated the
message. I remember there was some way to hide who I was when sending
the message, but have since forgotten that trick. Yep, them are some
true ! Good times! Good times!! Good times! Good times!
As usual, I digress.
I recently decided to try out Ubuntu to see what all the fuss was about. My notes here apply to Virtual PC 2007.
Downloading Ubuntu and Setting up the VPC
To start, download the iso image from the Ubuntu download site. I downloaded the 7.04 version first since I assumed the bigger the version number, the better, right? We’ll see this isn’t always the case as we’ll see.
For completeness, I also installed 6.06.
When creating a new Virtual PC, make sure to bump up the ram to at least 256 MB of memory. Also make sure there is enough disk space. I tried to skimp and had a problem with the install. If in doubt, use the default value for disk space.
Installing Ubuntu
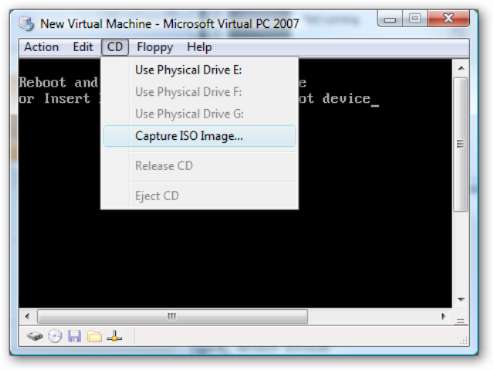
After creating a new Virtual PC machine, select the CD menu and then Capture ISO Image and browse for the iso image you downloaded.
When the Ubuntu menu comes up, make sure to select Start Ubuntu in Safe Graphics Mode. I’ll explain why later.

At this point, Ubuntu boots up and if you’re a total noob like me, you might think “Wow! That was a fast install!”.
It turns out that this is Ubuntu running off the CD. I must’ve been tired at the time because this confounded me for a good while as everytime I rebooted, I lost all progress I was making. ;) The next step is to really perform the install.
The Mouse Capture Issue
If you’re running Ubuntu 7.04, you might run into an issue where you can’t use the mouse in the VPC. This is due to a bug in some Linux distros where it cannot find PS/2 mice, which is the type that VPC emulates.
This post has a workaround for dealing with this issue by using the keyboard until these distros are fixed. Heck, this might be a great feature of 7.04 since it forces you to go commando and learn the keyboard shortcuts.
Ubuntu 6.06 does not suffer from this problem, so it may be a better starting point if you and the mouse have a great rapport.
The Real Install
At this point, you are ready to start the install. From the top level System menu, select Administration | Install.

The installation process asks you a few simple questions and doesn’t take too long.
The Bit Depth Issue
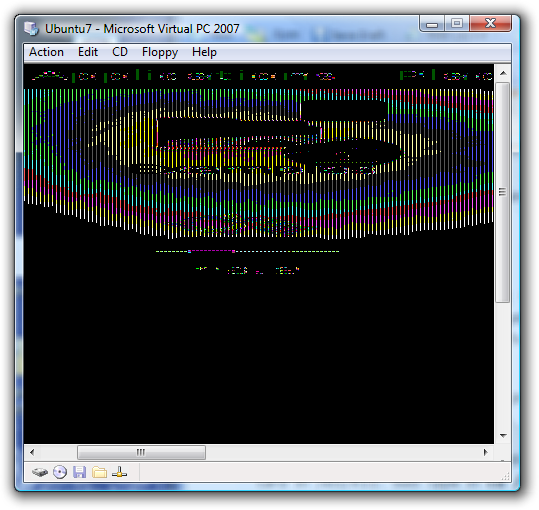
Earlier I mentioned making sure to start Ubuntu in Safe Graphics Mode. The reason for this is that the default bit depth property for Ubuntu is 24, which Virtual PC does not support. If you fail to heed this advice, you’ll see something like this. Kind of looks like that All Your Base Are Belong to Us video.
Fortunately, I found the fix in this post on Phil Scott’s blog (Phils rule!).**I bolded the essential elements.
Once I was in there, I found the configuration file for the graphics card in /etc/X11. Sso type in cd /etc/X11, although I certainly hope even the most harden of MScentric people can figure that out :). Once in there I opened up xorg.conf using pico (so type in pico xorg.conf - isn’t this fun?). Browse down to the screen section. Opps, looks like the defaultDepth property is 24, which VirtualPC doesn’t support. I changed this to 16 and hit CTRL-X to exit (saving when prompted of course). Typed in reboot and awaaaaaaay we go.
When I ran through these steps, I found that I had to use the sudo
command (runs the command as a super user) first. For example:
sudo pico xorg.conf
Your results may vary. Speaking of sudo,have you seen my
t-shirtfromXKCD.com?
Virtual Machine Additions for Linux
At this point, you’ll probably want to install the Virtual Machine Additions. Unfortunately, the additions only work for Windows and OS/2 guest operating systems.
However, you can go to the Connect website and download Virtual Machine Additions for Linux. It took me a while to find the actual download link because various blog posts only mentioned the Connect site and not the actual location.
Ubuntu isn’t listed in the list of supported distributions. I’ll let you know if it works for Ubuntu.
Now What?
So now I have Ubuntu running in a virtual machine. It comes with Open Office, Firefox, etc… preinstalled. My next step is to install VMWare and MonoDevelop and start tinkering around. Any suggestions on what else I should check out?
UPDATE: Perhaps I should use VMWare 6 instead since it supports multi-monitor in a virtual machine. That’s hot!
Comments
55 responses